Day 4: Setting Up POP3 Email Accounts in Gmail
When you make the switch from Microsoft Office to Google Docs, you don't just lose Microsoft Word and Excel, you also lose Outlook. One of the first things I did to kick off the 30 Days With...Google Docs project is to set up my POP3 email accounts in Gmail so I can continue to receive and respond to email messages.
So, for any readers who may wish to follow in my footsteps, or who stumble across this project at some point in the future, we are going to take a step back today and go over the steps to add a POP3 email account to Gmail. As a side note, I tried this in IE9, Firefox, and Chrome, and the buttons and text did not render properly in IE9. I recommend using Chrome for this process.
1. To begin, open Gmail and click on the gear icon at the upper-right of the browser window and select Mail settings.
2. In the links across the top of the Settings window, clickAccounts and Import.

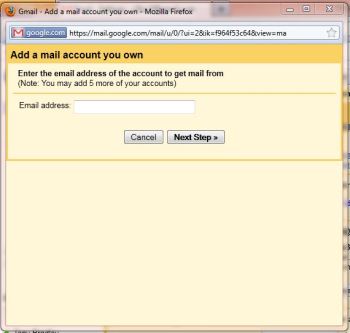
3. Type in the email address for the account you want to set up.
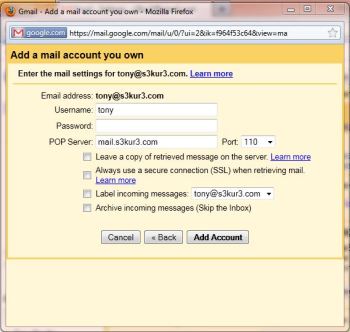
4. Next, you must enter the credentials and server information for your email account. Type in the username and password for your email account, and the incoming server information.
I checked the box to leave a copy of retrieved messages on the server so I can make sure my emails are also retrieved by my other PC, my iPhone, and my iPad. Unless you have been directed to use SSL or some other port, you should leave the port on 110 which is the default for inbound POP3. If you have multiple email accounts, you can also choose to label incoming messages to make it easy to identify which account it came in on.
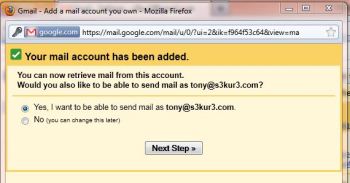
5. Once you have entered the information, click Add Account.
6. Gmail will verify that the account credentials and server are valid, then ask if you would also like to be able to send outbound email using this account.
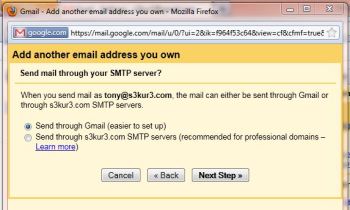
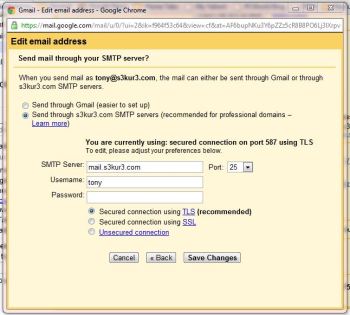
7. You have the option of specifying your outbound email server and credentials, or setting the outbound messages to go through the Gmail server.
Warning : If you choose to use the Gmail server, your emails will appear to come from your default Gmail account rather than from the specified email account. For example, the recipient will see ‘s3kur3@gmail.com on behalf of Tony Bradley <tony@s3kur3.com>' as the sender rather than just Tony Bradley, or just tony@s3kur3.com.
8. If you choose your own server, you must enter the username and password credentials, and the outbound server information to use. You also must specify whether to use SSL or TLS encryption for outbound messages. If you just want to send unencrypted SMTP email, click the port drop-down list on the right side of the screen and choose 25--the default SMTP port. Then a new radio button choice will appear below for Unsecured connection along with a warning from Google recommending that you not send your email messages unencrypted.
9. Regardless of whether you choose to send outbound email through the Gmail server, or with your own outbound mail server, Gmail requires that you verify that you are the legitimate owner of the email account to complete the process. A verification code will be sent to the email address and you must either click on the link in the email or manually enter the verification code to be able to start sending email from this account.
Voila! Setting up POP3 email within Gmail is actually quite simple. The only issue I ran into is that one of my email accounts uses TLS encryption on a custom port number, but Gmail only lets you select the default ports, so I was unable to set that account up for outbound email using my own server details. I set it to use the Gmail server, but that solution is less than ideal due to the Warning message in step 7.
But, it works. Now I don't have to use Outlook because all of my email messages are received in Gmail, and I can send messages from any of my accounts through Gmail as well.


0 comments:
Post a Comment